In the past few weeks I have had some very difficult images to restore. There were even times when I doubted my own ability as a restorer but I persisted and would love to share this particular image with you.
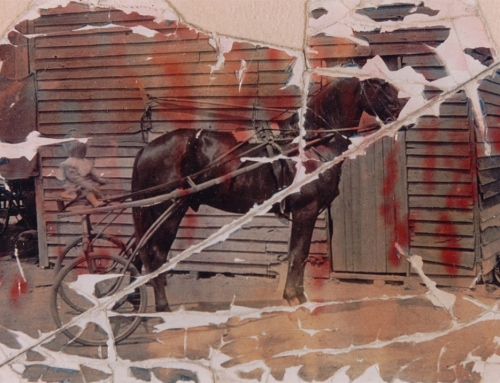
The original image appears to have been water damaged and at one time stuck behind glass. It had some surface mould and was warped. Some areas of the original image had a mottled glossy texture whilst there were sections where the emulsion of the fibre based paper had completely torn away. It wasn’t in good shape at all.

If you look closely at the image you will notice that it is also one from that era when photographers ‘drew’ outlines around underexposed areas or superimposed them in the darkroom to define borders and to highlight features. In this image, the feet of both boys had received such treatment plus areas around the older boy’s jacket and his younger brother’s head. I often find such features endearing; they remind me of the struggles faced by early photographers and photo retouchers, but in this case, the feet appeared to be floating in the foreground and disconnected from the boy. The youngest girl’s feet were almost entirely missing and let’s not forget the damaged emulsion on her older sister’s face. Sadly, this section of the image was mostly gone.
Thankfully, I was supplied with a second image of the children, taken approximately three years later which I was able to use as a reference.
 I began by converting the image to black and white. Colour would be restored later:
When I make my black and white adjustments, I mix colour channels which sometimes helps to eliminate damage such as mould spots and stains.
 Next came the very long and sometimes challenging task of repairing all of that damage. I do not recall how many hours I spent doing this. I would get ‘lost’ in the image. I was a little sneaky with the feet of the youngest girl and of the older boy. For these, I photographed my own daughter and son’s feet and used them to replace the original feet.

Next, I needed to add colour. This is the fun part. I have mentioned previously how much I love hand colouring images. I enjoyed it back in the days of oil colours and cotton wool and still do today, even though it is all done digitally.
There are quite a few different methods for adding colour. I start by adding a sepia tone to my portrait images, just as I would have with the traditional method. This adds a warmth to the image and makes it easier to achieve realistic skin tones.

I then create a new layer with a colour blending mode for every colour, paint the chosen colour, then adjust the layer opacity accordingly. By ensuring each colour is on it’s own layer, I can easily adjust the hue, saturation or opacity at any time without affecting all other colours.
And here is the final image;

Colour really brings the image back to life don’t you think?
It is such a lovely photograph which will hopefully now survive for many more years to come.

Many thanks to Wilma Smart for allowing me to share this beautiful image.
![]()